In the first part of this series, we successfully configured Single Sign-On (SSO) between Sitecore Content Hub and Okta Auth0. Now, it’s time to take our integration to the next level by implementing role-based access control.
This second part will guide you through mapping user roles from Okta to Content Hub user groups, enabling centralized permission management. We’ll cover creating app roles in Okta Auth0, configuring custom claims, and using Content Hub Sign In Scripts to automatically assign users to appropriate groups based on their Okta roles.
Prerequisites
Before proceeding, ensure you have:
- Completed Part 1 of this series with working SSO authentication
- Administrator access to your Okta Auth0 tenant
- Administrator access to your Sitecore Content Hub instance
- Understanding of Content Hub user groups and permissions
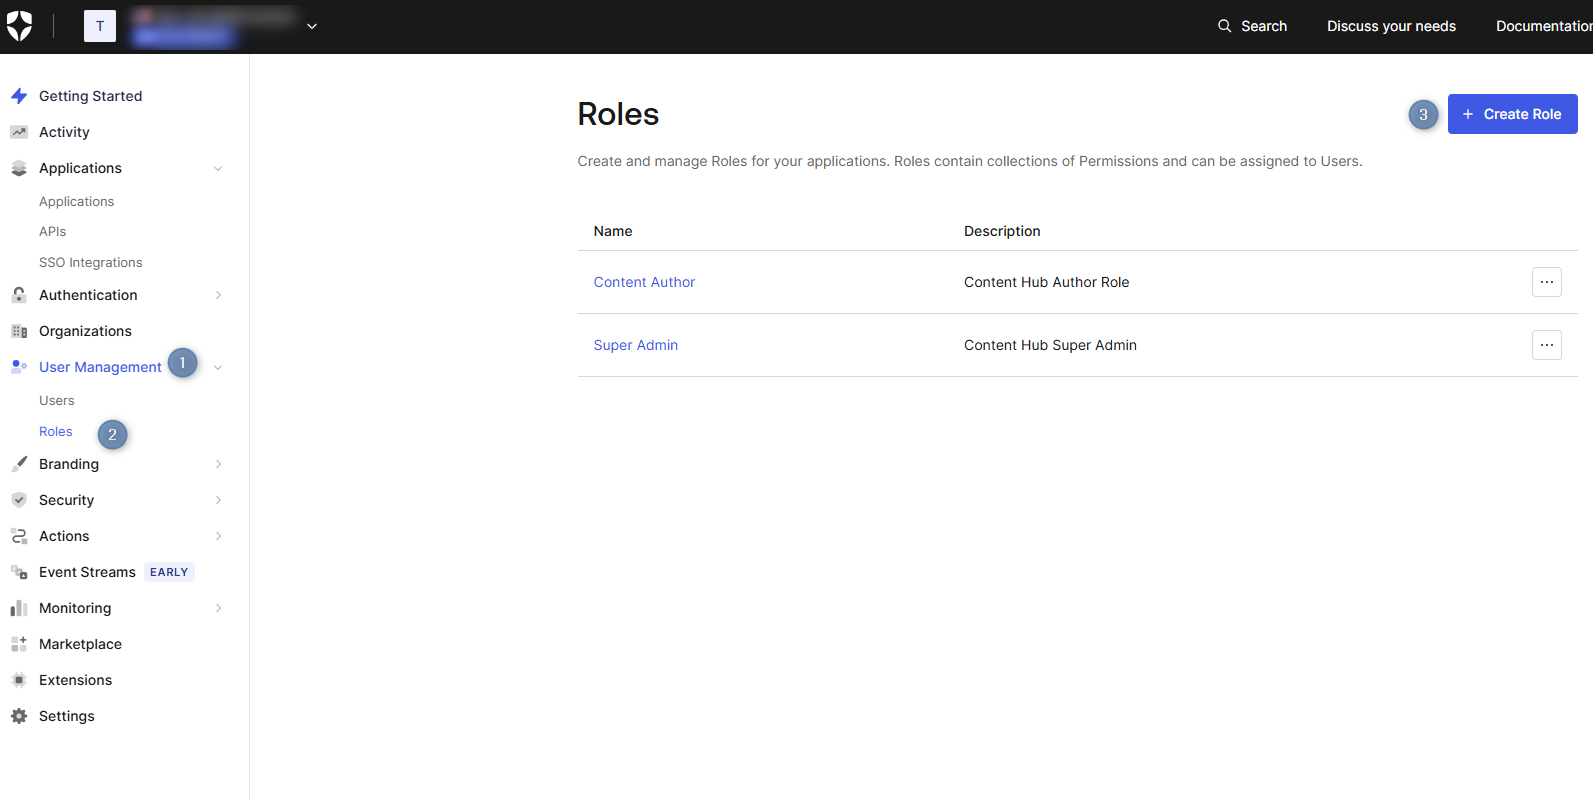
Step 1: Create App Roles in Okta Auth0
The first step is to define application-specific roles in your Okta Auth0 application. These roles will represent the different permission levels in your Content Hub instance.
-
Navigate to your Okta Auth0 dashboard and go to User Management > Roles.
-
Click Create Role
- Create roles that match your Content Hub user groups. For example:
- Super Admin - For Content Hub administrators
- Content Author - For content contributors
- Provide a description for each role to clarify its purpose.
Step 2: Assign Roles to Users
Once you’ve created the app roles, you need to assign them to users in your Okta Auth0 tenant.
-
In your Okta Auth0 dashboard, navigate to User Management > Users.
-
Select a user you want to assign roles to.
-
Go to the Roles tab and click Assign Roles.
-
Select the appropriate Content Hub roles for this user.
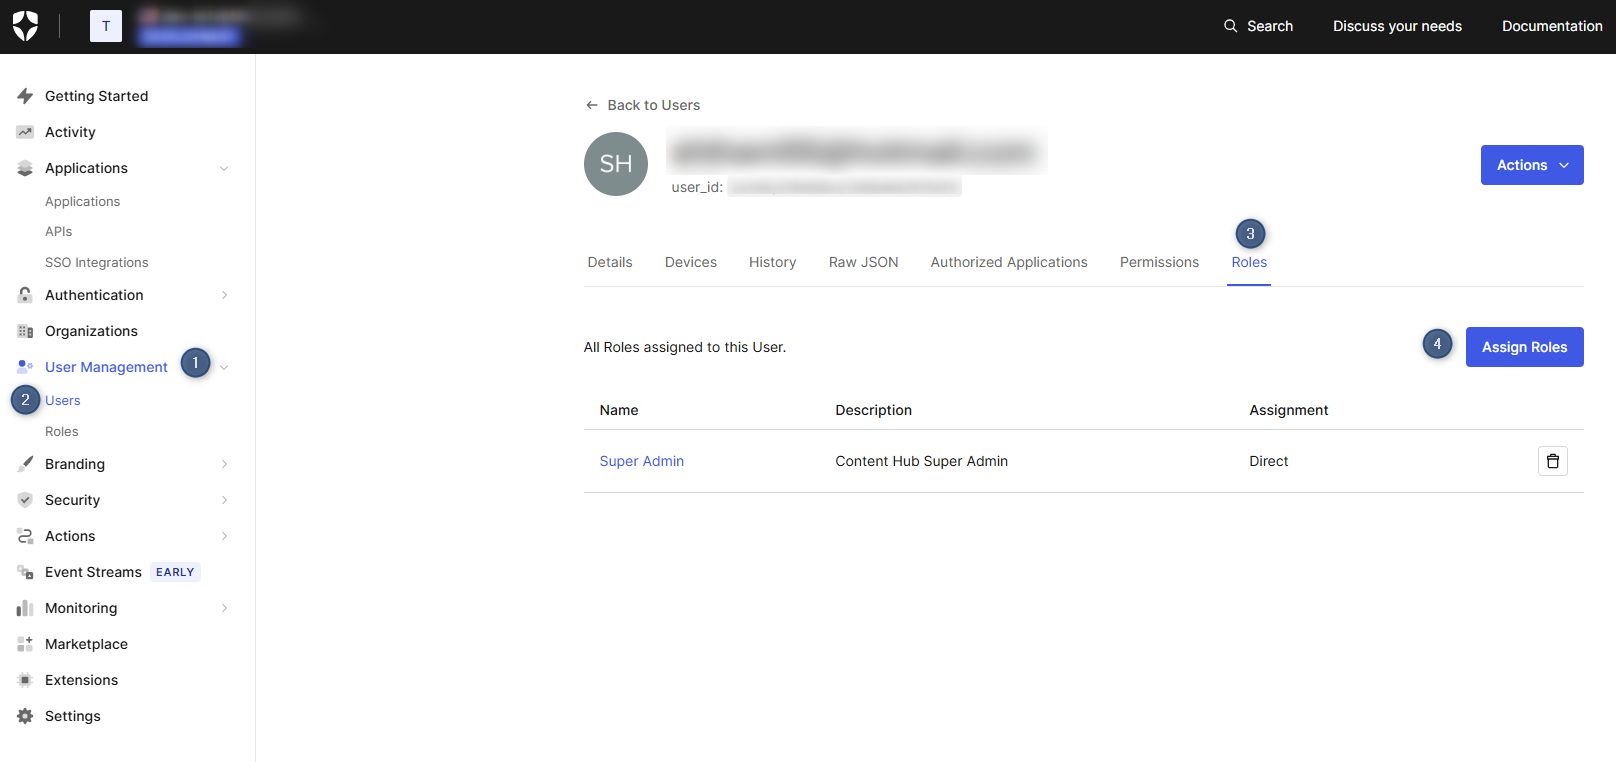
Alternatively, you can assign roles programmatically using the Auth0 Management API if you have a large number of users.
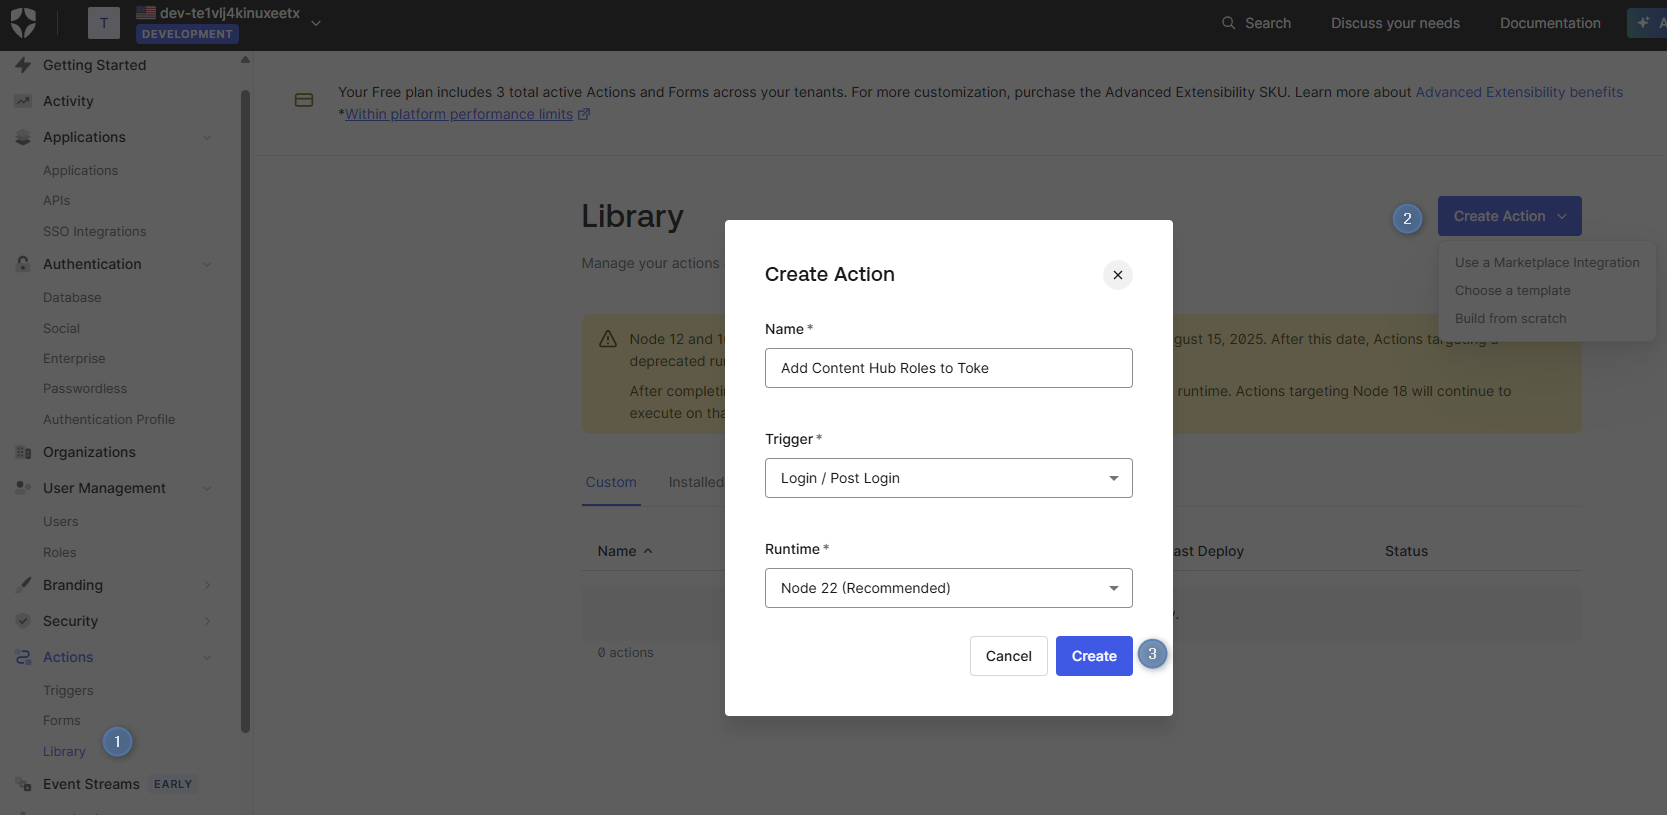
Step 3: Configure Custom Claims for Role Information
To include role information in the authentication tokens, you need to create a custom Action using the Post Login trigger in Okta Auth0.
-
In your Auth0 dashboard, navigate to Actions > Library.
-
Click Create Action and select Build from scratch.
-
Enter the name “Add Content Hub Roles to Token”, select Login / Post Login trigger, and click Create.
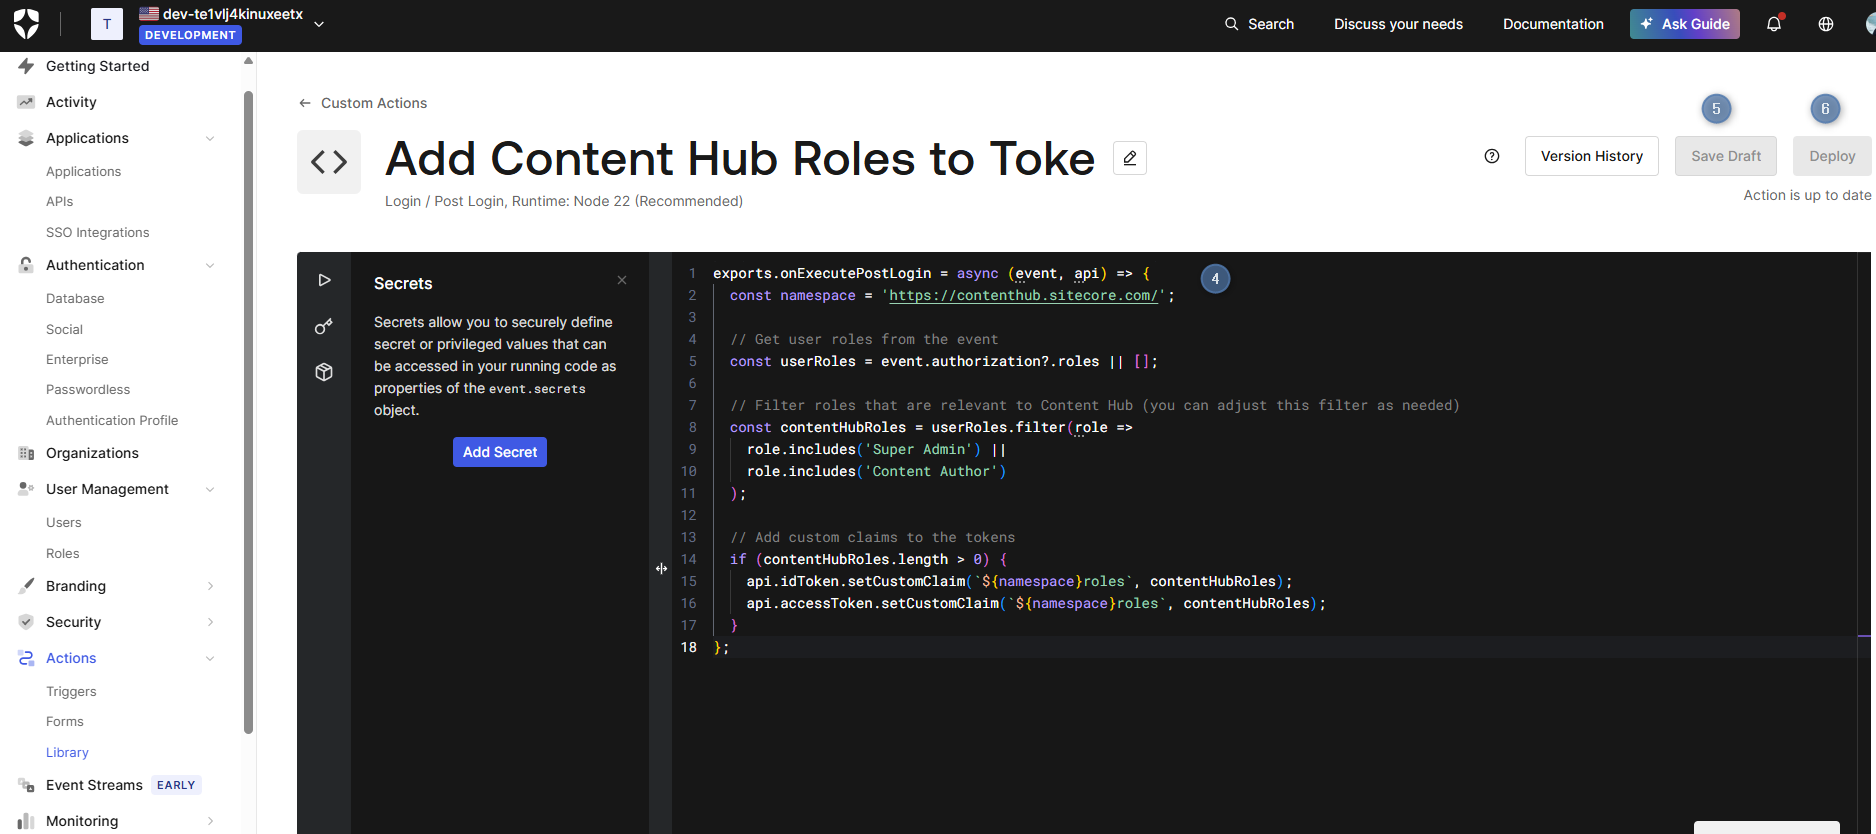
In the Actions Code Editor, replace the default code with the following:
exports.onExecutePostLogin = async (event, api) => {
  const namespace = 'https://contenthub.sitecore.com/';

  // Get user roles from the event
  const userRoles = event.authorization?.roles || [];

  // Filter roles that are relevant to Content Hub (you can adjust this filter as needed)
  const contentHubRoles = userRoles.filter(role =>
    role.includes('Super Admin') ||
    role.includes('Content Author')
  );

  // Add custom claims to the tokens
  if (contentHubRoles.length > 0) {
    api.idToken.setCustomClaim(`${namespace}roles`, contentHubRoles);
    api.accessToken.setCustomClaim(`${namespace}roles`, contentHubRoles);
  }
};
Click Save Draft and then Deploy to deploy your Action.
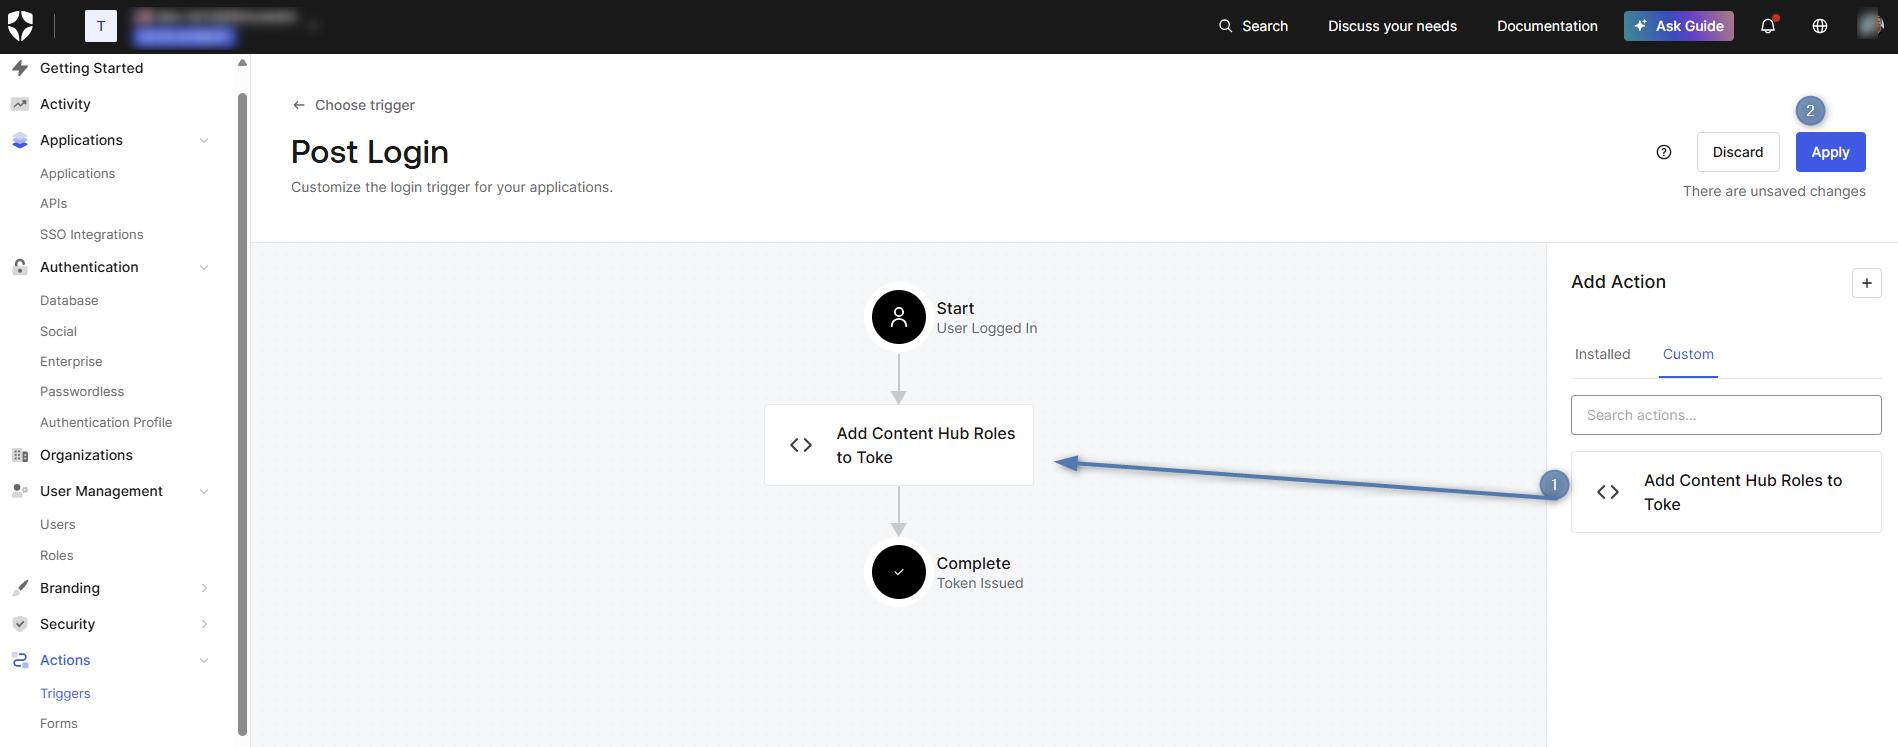
-
Navigate to Actions > Triggers and select the Post Login trigger.
-
Drag your “Add Content Hub Roles to Token” Action from the right sidebar into the flow between Start and Complete.
-
Click Apply to save the flow changes.
Step 4: Update Content Hub Authentication Configuration
You need to update your Content Hub authentication configuration to handle the custom claims.
-
In Content Hub, navigate to Settings > Authentication.
-
Under your
open_id_connectconfiguration, add the following claim mappings:
{
  "claim_mappings": {
    "https://contenthub.sitecore.com/roles": "roles"
  }
}
- Ensure your configuration includes the
scopeparameter to request the necessary claims:
{
  "scope": "openid profile email roles"
}
Step 5: Create Content Hub User Groups
Before implementing the Sign In Script, ensure you have the corresponding user groups in Content Hub.
-
In Content Hub, navigate to Settings > Security > User groups.
- Create user groups that correspond to your Okta Auth0 roles:
- CH.SuperAdmin (for Super Admin role)
- CH.Authors (for Content Author role)
- Configure appropriate permissions for each group based on your organization’s requirements.
Step 6: Implement Sign In Script for Role Mapping
Now, create a Sign In Script in Content Hub to automatically assign users to groups based on their Okta roles.
-
In Content Hub, navigate to Scripts > Create new script.
-
Select ‘User Sign-in’ and name it “Okta Role Mapping Script”.
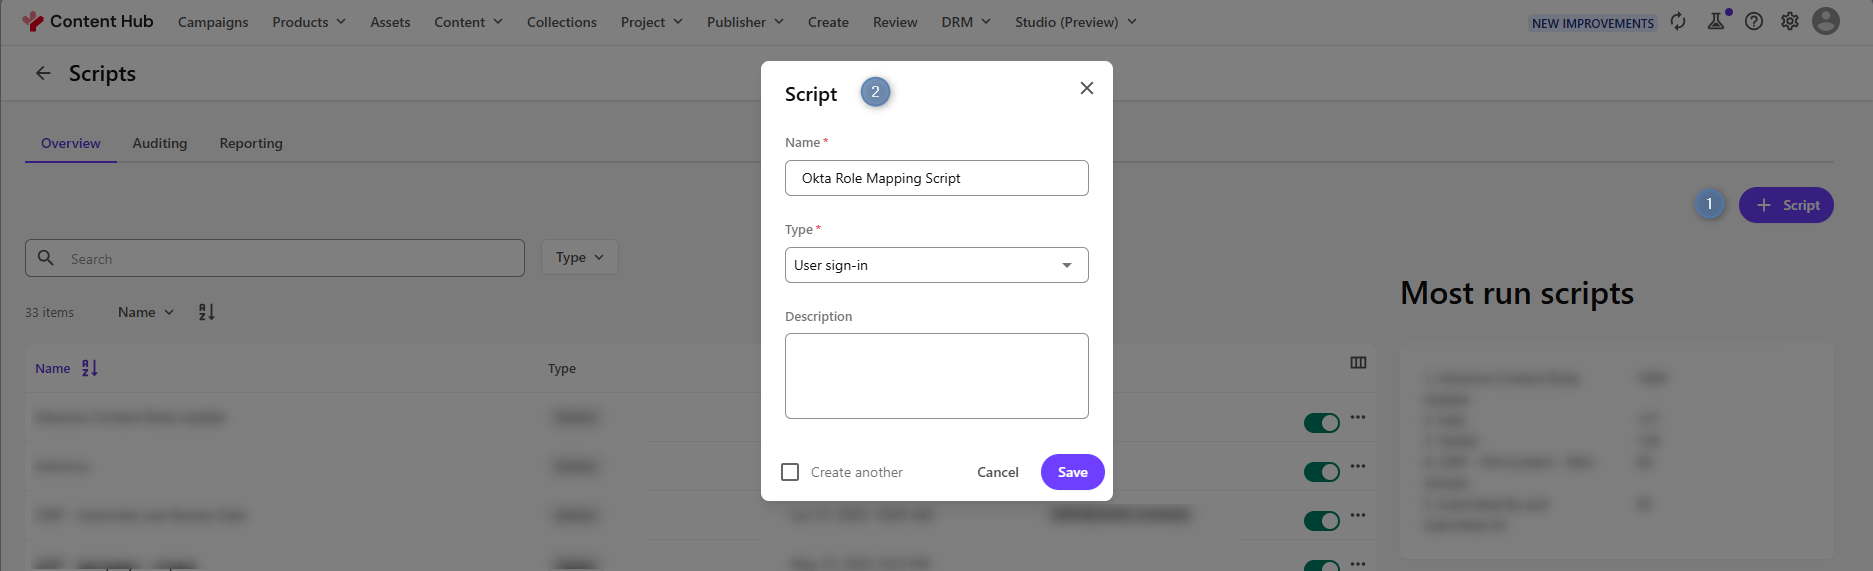
Add the following C# code, save and enable the Sign In Script.
Step 7: Test Role-Based Access Control
Now it’s time to test your role mapping implementation:
-
Test User Assignment: Create test users in Okta Auth0 with different role assignments.
-
Verify Login: Have test users log in to Content Hub through SSO.
-
Check Group Membership: Verify that users are automatically assigned to the correct user groups based on their Okta roles.
-
Test Permission Changes: Modify a user’s roles in Okta Auth0 and verify that their Content Hub group membership updates on the next login.
Troubleshooting Common Issues
Claims Not Appearing in Token
- Verify that your custom claim rule is enabled and properly configured
- Check that the namespace URL matches exactly in both the rule and Content Hub configuration
- Ensure the scope includes the necessary parameters
Users Not Added to Groups
- Verify that the user group names in Content Hub match those in your Sign In Script
- Check the Sign In Script logs for any execution errors
- Ensure the user has the necessary permissions to update group memberships
Role Updates Not Reflecting
- Remember that group membership updates occur only during sign-in
- Users may need to sign out and sign back in to see role changes
- Consider implementing a periodic sync mechanism for immediate updates if required
Best Practices and Security Considerations
-
Principle of Least Privilege: Start with minimal permissions and add as needed.
-
Regular Auditing: Implement regular reviews of role assignments and group memberships.
-
Error Handling: Add comprehensive error handling to your Sign In Script to prevent authentication failures.
-
Logging: Implement detailed logging for troubleshooting and compliance purposes.
-
Backup Groups: Consider maintaining backup admin access that doesn’t rely on external authentication.
Conclusion
You’ve successfully implemented role-based access control between Okta Auth0 and Sitecore Content Hub. This setup provides:
- Centralized Role Management: Manage user permissions from your Okta Auth0 dashboard
- Automatic Group Assignment: Users are automatically placed in appropriate Content Hub groups
- Dynamic Updates: Role changes in Okta Auth0 are reflected in Content Hub on next login
- Scalable Security: Easy to manage permissions for large user bases
This integration ensures that your Content Hub access control remains synchronized with your organization’s identity management system, providing both security and administrative efficiency.
With this complete setup, your Sitecore Content Hub and Okta Auth0 integration now provides both seamless authentication and sophisticated authorization capabilities, enabling you to manage user access effectively across your digital asset management platform.